by Sommer Poquette
Valentine's Day is right around the corner, which means love letters, heart-shaped candy and everything in red and pink. I used to love making cards for my friends and decorating a shoebox for all the cards I'd receive at school. "Who would be my Valentine this year?" I'd wonder.
* * *
Of course, as I got older, I had anxiety over this very same holiday because I worried I wouldn't have a Valentine. It can be a very brutal holiday for pre-teens and teens, which is why I'm enjoying the fun times, while my children are young.
Making homemade Valentine's Day cards, chocolate-covered strawberries, heart-shaped pancakes and giving my kids lots of smooches from mom: that's how I like to spend this special day now. February 14 is a fun day in our home, but we also enjoy all of the decorating and crafts before the holiday. It gives us the opportunity to have fun as a family creating heart shaped window decorations together.
If you have little ones or you like to decorate your windows before a holiday, like I do, you'll appreciate these fun craft ideas. They're simple to make and pretty to display, regardless of what type of window you have to decorate. Bay window, sliding glass door window, or a kitchen window.
Wax Stained Glass Hearts
This craft is a fully hands-on, messy, get-the-kids-involved project. To make your very own wax stain glass heart, you'll need old crayons with the paper peeled off, wax paper, a vegetable peeler and an iron. Draw a large heart onto one piece of waxed paper (wax side up) and then peel crayon shavings onto the wax shaped heart. Let your children have fun deciding which colors to melt together. My younger child took the paper off the crayon and my older child used the vegetable peeler. Use caution with the vegetable peeler; it is sharp.
After you have finished filling your heart with crayon shavings, place another piece of waxed paper (wax side down) on top of the heart. Using an iron on a low setting, melt the wax paper pieces and crayon shavings together. To do this, place the waxed heart on top of a towel. Place another towel over the waxed heart, to sandwich the heart between the two towels. Gently, go over the towel until the waxed paper and crayon melt together. Use caution with the iron around children; always supervise for safety.
The colors melt together and make a unique stained glass heart that can be cut out and then hung with tape onto a window of your choice. Find a window that you love, like a big bay window or simply over the kitchen sink, and let the sun shine through and fill your room with joy.
Tissue Paper & Ribbon Hearts
This is a very simple project that my children have done for years (since preschool). Yet, each year they want to do it again and enjoy the process and family time. We use construction paper and scrap pieces of tissue paper and ribbon leftover from the holidays. The children cut the ribbon into tiny pieces and tear the tissue paper or construction paper into small shreds. We set out small bowls, and while they're cutting and ripping, we talk about what we love about others, our family, each other and about the holiday. It's fun to just sit and talk while they're ripping and cutting. I think it's why the children like this craft so much each year!
After they've filled the bowls, we're ready to create our stained glass hearts. I cut several pieces of contact paper into heart shapes. We peel the backing off the heart shapes so that the ribbon and paper can stick together. The children make patterns, designs or just randomly add the ribbon, tissue paper and construction paper. It's about having fun, so there is never a wrong or right way.
Afterwards, I cover their art with another piece of contact paper (sticky side down) and trim the heart shapes. The tissue paper, ribbon and construction paper is simply stuck between the two sides of sticky contact paper to make unique and beautiful window art.
Create a Valentine's Day Heart Garland Banner
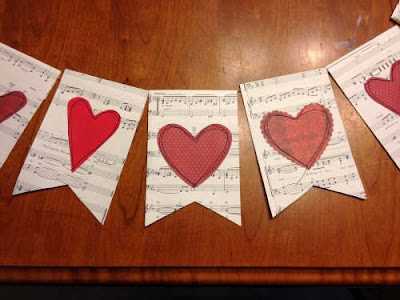
Over at Quilted Cupcake, Jean Kake gives you a step-by-step tutorial on how you can create your very own homemade Valentine's Day Banner. (The heart banners are made with vintage book paper or sheet music, found at thrift stores, and paper hearts sewn around the edge twice with black thread. To hang banners, fold top edge of paper over string.) This is a great project to do with your children. Let them choose the paper, colors and design. Plus, you can use your banner year-after-year, changing which window you hang it from. It's a beautiful and unique looking Valentine's Day decoration that nobody else will have, because you made it.
Valentine's Day, regardless of your age, can be a day where you show others, even yourself, some love. Even though I love the chocolate and flowers that come with the holiday, most of all, I love seeing my children create these fun works of art and us spending time together, focusing on our love as a family. When I look out my window and see their pieces of art, it makes me smile. I remember our conversations and how they won't be little forever.
Window art projects are wintertime craft ideas the whole family can take part in. You can view great windows for your art on the Home Depot website.
* * *
Copyright © 2014 by Sommer Poquette. All rights reserved.


