"Miniature Rag Doll Ornament"
This little rag doll became an ornament after my mother had given me a regular size doll for Christmas one year. I wanted to make a smaller version for an ornament to give her for Christmas the following year and came up with the below ornament.
Supplies:
8 x 10 inch piece of beige or muslin fabric
One 4 1/2cm x 13 cm piece of patterned fabric (bottom layer of dress)
One 6 x 6 inch piece of striped fabric, red striped if you have it (for legs)
One 8 x 10 inch piece of red fabric
One 5 inch piece of ribbon
Fine point black and red markers
Cotton balls for stuffing
Thread and needle
Hot Glue Gun
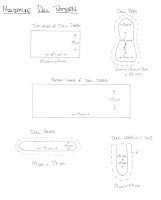
(click on pattern to enlarge and print)
Directions:
1-Cut out two pieces for the doll body and two pieces for the arms with the 8 x 10 inch piece of beige fabric. Place small pin in the middle of the doll body pieces and a pin in the middle of the arm pieces. Sew the two pieces together for the doll body leaving a small opening to stuff the body of the doll and do the same for the arms.
2-Once the doll body and the arm pieces have been sewn together, leaving the opening, turn each of the pieces inside out and you can then begin stuffing both pieces with the torn cotton balls until stuffed fully and then sew up the opening.
3-Cut out pieces for legs using striped fabric. You will need a total of four pieces, two for each leg. You do not have to sew the top of the legs shut because they will be hot glued to the back of the doll. Sew the two pieces together for each leg, turn inside out, stuff leaving a 1/4 inch from the top of the leg free of cotton balls so you can hot glue them onto the doll.
4-Cut out 9 squares measuring 3 1/2 cm x 6 1/2 cm of red fabric for the hair. Once these are cut out then cut each square into 1/4 inch stripes. You can do this by sight or you can measure each strip. They do not have to be perfect. Each square equals one batch of hair and you will need 8 to 9 batches of hair. Take 5 pieces of the fabric strips, line up and fold over. Take needle and red thread and place one simple stitch in the middle of the fold of fabric to hold batches together.
5-Cut out a 3 1/2 cm x 6 1/2 cm piece of beige fabric for top of apron. You can leave the apron blank, or you can hot glue little squares of fabric to corner of apron to look like patches or you can glue tiny buttons, or sew a little design on it. I sewed a few small x x along the bottom of my apron using just red thread, doubled.
Assembling Directions:
1-Take arm piece and place a line of hot glue close to top of head of doll and attach arm piece to hot glue, bending and softening arm piece to make the arms bend around the front of the doll and hot glue leg pieces to bottom of the doll.

2-Take the 4 1/2 cm x 13 cm piece of patterned fabric, for the bottom of dress and place a small dab of hot glue at top left hand corner of fabric and fold over making a small pleat and repeat this process all the way across the top of fabric to give the dress a ruffled look and hot glue pleated top around the base of the neck of the doll.
3-Take 3 1/2 cm x 6 1/2 cm piece of muslin fabric for top of dress and do the same and attach on top of the bottom piece of dress.
4-Take one batch of sewn red fabric for hair and place hot glue on the outside fold of the fabric batch and place where the ear would be on the doll and continue gluing pieces in line, on top of the doll head until you reach where the other ear would be.
5-Hot glue piece of ribbon, making a loop, to the back of the head of the doll to hang on tree.
6-You can make a small bow and attach to top of dress if you would like also.
7-Draw eyes, nose and mouth on doll head with fine point black marker and color in nose with red fine point red marker. You can also write your name and date on the back of the doll with your markers.
Frugal Living Index
Copyright © 2011 by Beth Helwig. All rights reserved.


