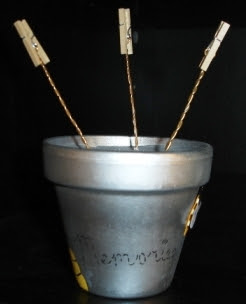
Submitted by Jill Badrick
These photo holders make great gifts for birthdays, graduation, Christmas, or any holiday.
* * *
Supplies:
3 ½ in. clay pot
2 in. Styrofoam ball
Masking tape
Craft wire (22 or 24 gauge)
Mini-clothespins (1 in.)
Embellishments (i.e. stickers or jewels)
Sharpies (ultra-fine tip) or gel pens
Spray can paint and/or acrylic craft paint
Plaster of Paris
Directions:
1. Remove any stickers from the clay pot, paint the outside and bottom of the clay pot using spray can paint or acrylic craft paint. (I find it easier to use spray paint to get an even coat that covers the clay pot.) Also paint the top 1" inside surface of the pot. Allow spray paint to dry.
2. Decorate the flower pot with a design of your choice using paints, markers, jewels, stickers, etc. 3-D scrapbooking stickers/embellishments work well to decorate the clay pots. Also, fonts, sayings, and designs can be traced from a scrapbooking or craft book onto tracing or tissue paper and then onto the pot rather than using a free-hand design, if desired.
3. Cut three pieces of craft wire of various lengths (i.e. 4, 5, and 6 inches). Thread each wire through one mini-clothespin and fold the wire in half. Twist the wire starting at the end nearest the clothespin trying to keep the wire especially tight around the spring of the clothespin. Keep twisting until the wire is twisted as tight as you desire.
4. Place the Styrofoam ball into the clay pot and stick the wires with clothespins into the Styrofoam so that the clothespins all face the same direction. You can adjust the height and angle of the wires by varying the placement and depth of the wires within the Styrofoam ball.
5. Cover the hole on the bottom of the clay pot with masking tape. Mix up approximately 1 c. of Plaster of Paris following the directions on the container. Pour the plaster into the pot until the plaster covers the Styrofoam ball and is level.
6. Adjust the wires and clothespins while the plaster is still soft.
7. Allow the plaster to harden, paint the top of the plaster to match the outside of the pot.
8. Put wallet size or 4 x 6 pictures in the mini-clothespins.
* * *
Return to Homemade Gift Ideas
Copyright © 2010 by Jill Badrick. All rights reserved.


