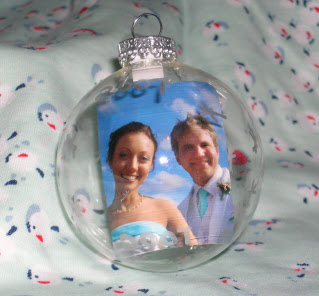
"Personalized Photo Ornament"
This ornament was special to us this year because it was our first Christmas together married, and we used one of our wedding pictures for the ornament. We gave these ornaments out as Christmas gifts to our families and they went crazy over them. Our family and friends felt the ornaments were so personal and wanted to have a tree full of ornaments like this one with a variety of pictures inside.
Supplies:
Ornament balls, called out as 9"ornaments
Sharpie paint marker (or other brand paint marker)
Computer to edit picture size to fit into the ornament
Scissors
Instructions:
1. Choose a picture you would like to place in an ornament.
2. Resize the photo on a computer program to be approximately 2 1/4" high x 1 3/4" wide.
3. We inserted 8 of these pictures on one page (Microsoft Word document) to maximize the space and make it cheaper to get more pictures printed at once. See the photo below for the example of how to fit the pictures onto a page for printing. You will need the additional space above the photos to make a "tail" to place the photo into the ornament.
4. Save your sheet of pictures onto a CD-R to take to the store to print (or you can print at home if you have a nice photo printer).
5. If you're printing at a store, go to a location that will print your file as an 8.5" x 11" sheet of pictures. We went to Kinko's.
6. Before you cut out the pictures, note on attached picture layout example a guide of how to cut out the pictures. This helps you to be able to locate the picture once you've put it in the ornament with the extra "tail" at the top of the picture.
7. Cut out the pictures in the diagram as shown. Leave as long of tail as possible at the top as you'll cut the excess off later once you insert the picture into the ornament.
8. Carefully roll the picture around itself, vertically, so you can slide it into the ornament. Don't curl the tail, it should slide in as is. Leave the extra photo paper at the top tail hanging out of your ornament as you cut it out as you'll use it to locate the picture in a minute.
9. Place the rolled picture into the ornament.
10. Use a pair of tweezers to carefully unroll the picture inside the ornament and place it as you like it. We used a pair of Tweezerman pointed tweezers. The Tweezerman pointed tweezers are at Bed Bath and Beyond or Sally's Beauty store. To help adjust the picture, you can bend the against the curl so the picture becomes more flat again.
11. Cut off the extra tail, flush with the ornament, so the cap will fill on the top of the ornament.
12. Use paint markers to write the year on your ornament. You can also do other designs on your ornament (we drew stars). You can even write a personal message. We used a silver Sharpie paint marker. Stencils and paint are another option for decoration. There are also gold or other colors you could use to decorate your ornament.
For this ornament, we left the back of the photo plain and decorated the ornament with stars. If you want to get even more crafty, you can insert a second picture facing the opposite of the ornament so you have two different pictures showing. You could also stuff the inside of the ornament with string or confetti to hide the back of the picture.
Frugal Living Index
Copyright © 2007 by Rachel. All rights reserved.


